What should you do with the furs that you have worked so hard for on your trap line? With fur prices at an all-time low, it’s more fun to tan the furs yourself, so that you can enjoy the memory for years to come. With a few simple steps, you can have a nicely tanned wall-hanger!
McKenzie Taxidermy Supply carries a line of tanning supplies that are easy to use and create a beautiful finished product. I have been using these supplies to tan the furs that I have harvested on my trap line.
The products that you will need :
- McKenzie’s Ultimate Acid
- McKenzie Brush-On Tan
- McKenzie’s Relaxer/De-greaser
You have been working hard on your trap-line and you finally connected with that furbearer that you have been chasing; now you want to preserve it for years to come. What’s the process? First, you want to skin your furbearer. The case skin is the best method for skinning furbearers. The case skin works from the hindquarters of the animal to the head. Once you’ve got your furbearer skinned, you will want to use a fleshing beam and a fleshing tool to carefully remove any remaining fat or membrane, exposing the pores in the underside of the skin.
After skinning and fleshing, your hide now needs salted. To do this, you need to flip the hide so that it is inside out. Lay the skin on a flat surface and use generous amounts of non-iodized salt to completely coat the hide. Local feed-mills are great places to pick up large quantities of mixing salt, which is cheap and works well. Be sure to lay plenty of salt underneath the hide so that all of the skin is covered. The salt begins the preservation of the skin and prevents the growth of bacteria.
You will need to allow the salt to dry the hide out for two to three days. While the hide is drying, you will need to mix up the acid solution, or pickling agent, to place the hide into after the salt cure is complete.
To mix the acid solution,
- You will need a plastic container that can hold a minimum of 5 gallons of water. Do NOT use a metal container!
- Using a fluid measuring cup, measure out ½ fluid ounce of acid to every gallon of hot water.
- You will also need to measure out 1 pound of non-iodized salt to every gallon of hot water. Mix the solution until all of the salt is dissolved.
- You will at this point add the degreasing and relaxing agent to your mixer. You will need 2 fluid ounces per every 5 gallons of water.
After two to three days of the salt cure, the hide is ready to go into your acid solution. Wearing rubber protective gloves, and using a wooden rod or spoon, gently stir the contents of the solution until the hide is fully submerged.
After two to three days in the acid solution, you will need to neutralize the acid in your hide. Mix a neutralizing solution with hot water and baking soda in a plastic bucket or bin. You will need one heaping spoonful of baking soda to one gallon of water. Submerge the hide in the solution and allow to soak for at least 30 minutes. While wearing your protective gloves, carefully remove the hide from the solution and wring out as much of the water as you can.
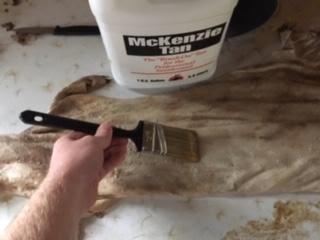
Take the hide to a flat work space and liberally apply the McKenzie Brush-On Tan using a paintbrush. Be sure to get the tanning oil on every inch of the face, body, and tail of the animal. Roll your hide into a tight ball and wrap tightly in a plastic bag. Let it sit until the next day. This will give the tanning oil time to work into the skin. Picture below shows the brush on tan being applied.
After the tan has worked for at least 12 hours, remove the hide from the bag and wash it vigorously, using hot water and a degreasing soap. I have found that Dawn dish soap works best for this. This will clean any leftover oils and grease from your fur, and will help remove the smell of the tan.
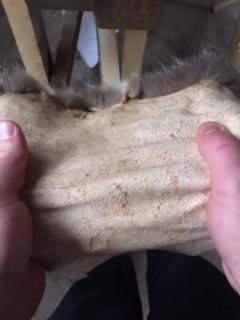
Hang your hide up to dry with the leather out and the fur in. It will take a few days for the leather to completely dry. During this time, regularly take your hide down to stretch and pull on the leather. You will see the hide “breaking” or turning white and softening. The more you work your hide, the softer the leather will be. Picture below shows the breaking in of the hide.
When the leather is dry, you can now turn your hide to the fur side. Allow the fur to air-dry and gently comb out any tangles or clumps. Your tanned fur is now ready for you to display.
These simple steps will provide you with a home tan that you can enjoy for years to come!
If you don’t have the time or the resources to tan your own hides, my wife and I offer tanning services to our fellow outdoorsmen. You can look us up on Facebook at “Heeter’s Fine Furs”. We would be glad to share any advice or tan that prized furbearer!
Here is a link on how to skin your furbearer https://youtu.be/rfsmPFAwUzc
If you have any questions for Tyler you can reach him through his Facebook Page https://www.facebook.com/tyler.heeter.37
Give Heeter’s Fine Furs a follow as well https://www.facebook.com/Heeters-Fine-Furs-101577194771979/
You can follow everything Cervicide has going on https://www.instagram.com/cervicide/