I recently published a blog on our sister company angler-pros.com about taking cinematic photos. In the age of digital where there are so many things shared, it’s nice to have content that you are proud of. There is no excuse for grainy, out-of-focus, boring photos as the technology we have at our fingertips makes it so easy to look professional. With applications like Snapchat, Instagram, Facebook, and text messaging, it’s likely the average person sends upwards of a dozen pictures a day, and that equates to thousands of photos a year!
While I want to dive into some of the topics that I did in my fishing photography blog, I want to leave my Cervicide family with a piece of advice: Perfect practice makes perfect. If the photos you are already taking throughout the day (Snapchat, texting, social media) are done haphazardly, then you’re likely never going to be a great photographer. There is so much to process all at one time when taking a cinematic photo that in real world situations, like when you’re celebrating a downed animal, you’re getting a candid action shot in the field, or you’re taking a group photo at camp, sometimes there are only seconds to get the shot just right. This is why perfect practice makes perfect – you shouldn’t have to think twice about taking the right shot.
There’s a couple things that you need to process immediately in a seamless fashion to get a great action photo that doesn’t look staged. Photography is a dance and you need:
- The subject
- Capturing emotion
- Proper lighting
- Depth of field
Wow, sounds easy, right?
The Subject
So why is it that something so simple, that I can break down into only 4 categories can yield so many different outcomes? I conducted an experiment on our private Cervicide FieldStaff page where I asked our staff to upload a pic of their favorite Cervicide hat. I received a bunch of responses where the subject is nearly the same, but there were no rules. I’ll post some of the pictures below so you can see the difference of a cinematic photo vs. one that didn’t have much thought. Now stop and think about the 4 categories that I explained and you’ll have a better understanding that for a photo to truly look good, you need all parts to the equation.
Capturing Emotion
Why did I choose a hat? Well there was a reason behind it – it’s an inanimate object. Essentially it’s up to the photographer how to add emotion to an inanimate object. Place that same hat on someones head and now you just brought it to life. Is that hat drying out in the sun after being wet? Perhaps it was being tossed midair; there are all sorts of ways to add emotion to an inert object.
A great photographer lets the end viewers mind wander so the photo tells a story to them. The viewer’s mind should fill in the blanks. This is why there needs to be a sense of emotion in a photo. Even if the subject you’re photographing doesn’t have emotions, you can position the subject where emotion will bring it to life.
The next important thing I see a lot of hunters doing wrong with photos is not paying attention to the background. In order to nail this down, it is so crucial to practice this anytime you’re taking photos. Even when you’re using Snapchat you can practice this. The background is a perfect opportunity to tell more of the story without words. Put it this way, whitetail deer are huntable in almost every state. When a hunter takes a picture of their harvest, the backdrop can give the viewer a lot of information right off the bat. You get an idea for the terrain it was harvested in: farm country, mountains, maybe there was snow on the ground, or palmetto trees signifying southern heat.Was this in a remote destination or in a city? The background tells a lot of the story and it also adds depth to the picture which makes it more cinematic.

Take this photo for example. The lighting isn’t ideal and there are a lot of shadows being cast on the subject. Additionally, it doesn’t add much emotion or tell a story. As a viewer, this photo is not very captivating.

This photo has better lighting and the background gives viewers an idea of where the subject is. It also tells a story and is captivating – what exactly is he doing? Where is he going? The viewers’ mind can wander and create a story all their own.
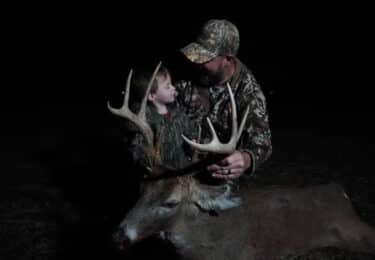
Lighting
The next thing to help with a photo being more cinematic is the lighting. Lighting is such an important thing, and really comes into play for whitetail hunters as there are a lot of instances where harvest pictures are taken at dark. Before the harvest pictures, there’s an elephant in the room I need to address and thats the tree stand selfies. First off, one of the things I see a lot of guys do is snap a bunch of pictures from their tree stand. They are stuck in one position, usually their back to the tree and it almost never fails these pictures are taken about an hour after sunrise. To the hunter it’s bright daylight, they are bored, and they start snapping pictures. This makes for some really grainy pictures, poor usage of the rule of thirds, and angles where the backdrop just looks silly, and is very unflattering for the hunter. There are a few ways to make treestand selfies better (I personally think they are played out) and the first way to up the tree stand selfie game is to wait until there is adequate light!
Here I’ll post one of my all time favorite treestand selfies which has amazing lighting, background, and emotion by Brendan Kelley of Ohio. To get a shot like this you’ll need a DSLR camera with an f stop below 4. I would suggest that you manually focus the lens so it will stay focused on whatever you want (in this case your face). Sometimes the auto focus will jump around so much you’ll never get the shot. A fourth arrow camera arm to hold the camera and a timer are helpful tools, too. Brendan’s emotion in this photo is awesome. He’s focused and it looks like he’s ready to cut the arrow loose!

I don’t want to offend anyone here so just go ahead and open up Instagram and search #treestandselfie and you’ll see for yourself exactly what I’m talking about NOT TO DO.
Depth of Field
Ok – Rule of thirds, I briefly mentioned this before, but let me dive into this one real quick. The idea of the rule of thirds is to divide your photo in 3rds from top to bottom and side to side. You either want your subject to be focused in the dead center of your picture, like Brendan’s above or you want to have the subject offset so you can add some depth of field in the picture. Just go on Google and type in ‘rule of thirds’ for some examples. If you begin applying this rule to your photos, you’ll instantly become more cinematic.
I intentionally didn’t get into harvest pictures with this blog as I’m going to leave that for another blog. I want you to take some of my advice that I talked bout and begin applying it to your pictures. Most importantly, start applying it to the pictures you already take every day. When you go to take a photo that you want to last a lifetime, you’re going to be so much quicker to do the right things automatically that you’ll be able to get more creative with your shots and move to the next level with your photography skills. Check out the blog post I did on Angler Pros as I dove into some of the concepts we just talked about and applied it to fishing.